Pani Puri Recipe | Mumbai Style Golgappa & Spicy Pani
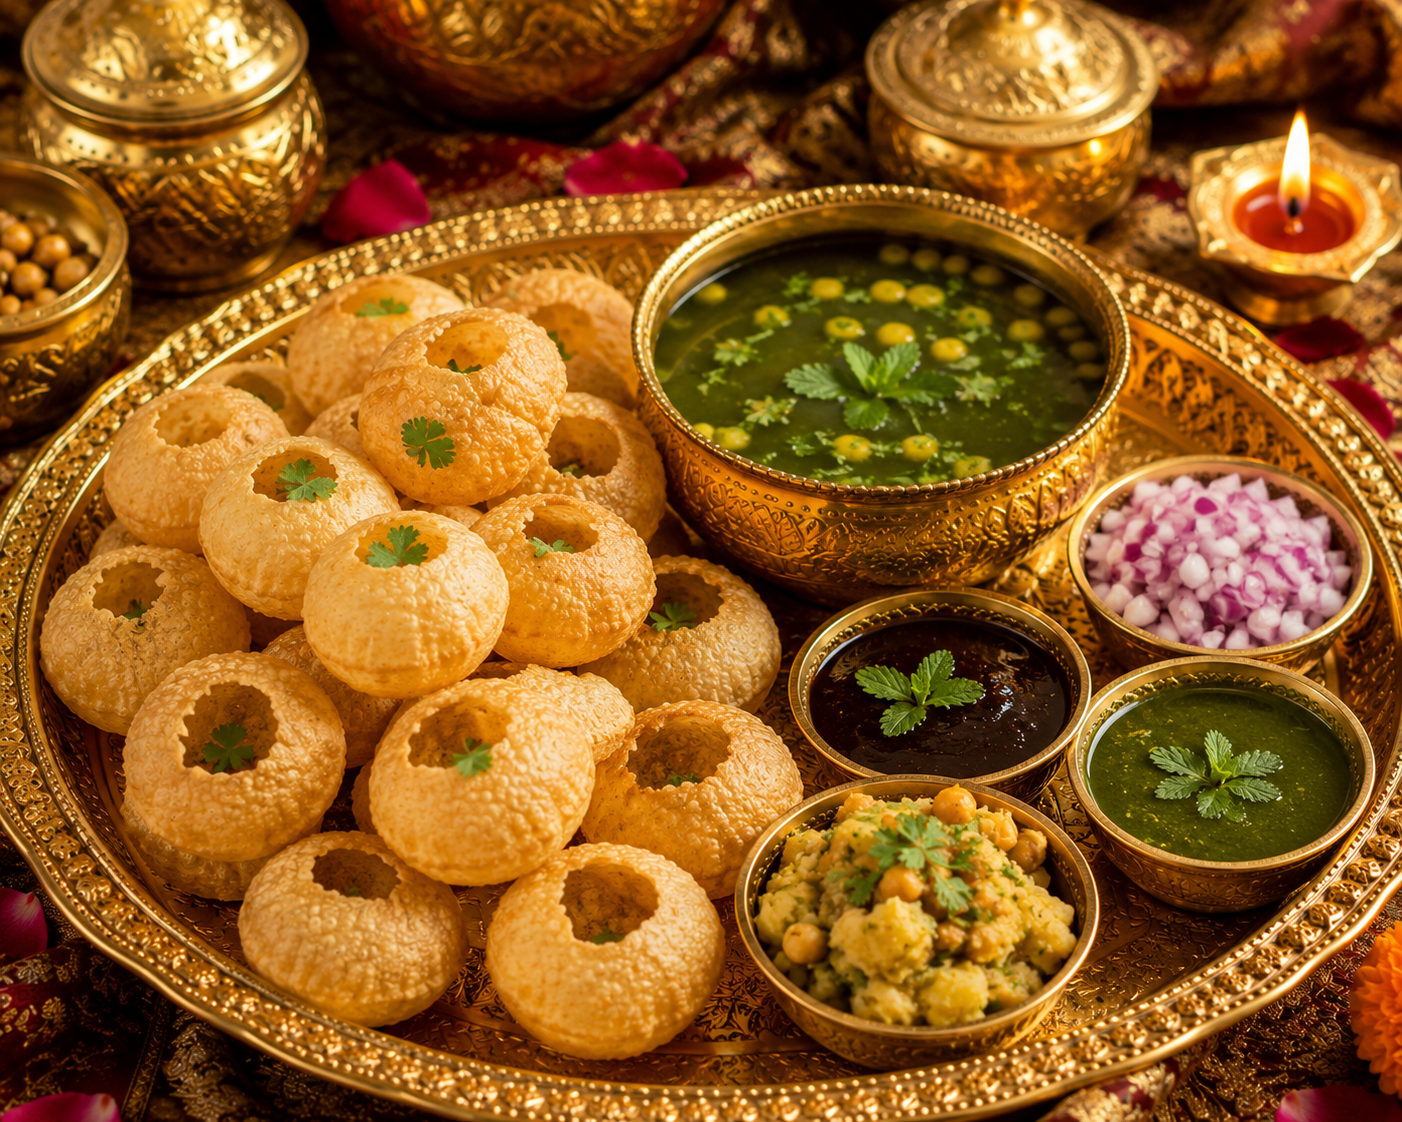
Learn how to make authentic Mumbai-style Pani Puri at home with crispy puris, spicy mint-coriander water, tangy tamarind flavors, and delicious potato-chickpea stuffing. This famous Indian street food delivers the perfect combination of crunch, spice, tanginess, and freshness in every bite. Whether you’re hosting a party or craving your favorite chaat, this homemade Pani Puri recipe brings the true street-food experience to your kitchen.
Recipe Overview
Recipe Summary
Prep Time
40 Min
Cook Time
10 Min
Total Time
50 Min
Difficulty
Easy
Yield
30-35 Puris
Calories
180 kcal
About This Recipe
Pani Puri, also known as Golgappa, Puchka, or Gupchup in different regions of India, is one of the country’s most loved street foods. Crisp hollow puris are filled with a flavorful potato mixture and then dipped into spicy, tangy, mint-infused water before being enjoyed in a single bite.
The secret to unforgettable Pani Puri lies in the balance of flavors. The pani should be spicy, tangy, refreshing, and aromatic, while the filling should be lightly seasoned and satisfying. Combined with crispy puris, every bite becomes a burst of textures and tastes.
This homemade recipe helps you recreate the authentic street-food experience with easy-to-follow instructions, expert tips, and traditional ingredients. Perfect for parties, summer evenings, festive celebrations, or whenever you’re craving your favorite chaat.
Why You’ll Love This Pani Puri Recipe
- Authentic street-style flavor.
- Refreshing mint and coriander pani.
- Perfect balance of spicy, tangy, and savory flavors.
- Easy to customize according to your spice preference.
- Ideal for parties and gatherings.
- Budget-friendly homemade recipe.
- Fun and interactive to serve.
- Can be prepared in advance.
- Loved by both kids and adults.
- Includes detailed chef tips for best results.
What Makes This Pani Puri Special?
Unlike many quick recipes, this authentic Pani Puri recipe focuses on creating deeply flavorful pani using fresh mint, coriander, tamarind, and traditional spices. The filling is perfectly seasoned, and the pani is chilled before serving to deliver the refreshing street-food experience that makes Pani Puri one of India’s most beloved snacks.
For the Spicy Pani
For the Filling
For Assembly
Ingredient Substitutions
- Black chickpeas can replace white chickpeas for a richer filling.
- Boiled white peas can be used instead of chickpeas.
- Lemon juice can replace tamarind pulp for a brighter tangy flavor.
- Jaggery can be added for a sweet-spicy pani variation.
- Fresh mint can be replaced with extra coriander if unavailable.
- Green chili paste can be used instead of fresh chilies.
- Rock salt can replace black salt if needed.
- Sprouted moong can be added to the filling for extra nutrition.
- Sweet tamarind chutney can be added to the pani for a sweeter version.
- Homemade puris can replace store-bought puris.
Step-by-Step Instructions
Wash and Prepare the Herbs
Thoroughly wash the mint leaves and coriander leaves under running water. Remove any damaged leaves and roughly chop them for easier blending.
Fresh herbs are the foundation of flavorful pani and contribute freshness, aroma, and vibrant color.
👨🍳 Chef Tip: Soak the herbs in cold water for a few minutes before washing to remove dirt more effectively.
Prepare the Pani Masala Base
Add mint leaves, coriander leaves, green chilies, ginger, tamarind pulp, roasted cumin powder, black salt, chaat masala, and a little water to a blender.
These ingredients form the aromatic and flavorful base of authentic street-style pani.
👨🍳 Chef Tip: Use fresh ginger rather than ginger paste for a cleaner and more refreshing flavor.
Blend Until Smooth
Blend the ingredients into a smooth paste. Scrape the sides of the blender if needed and blend again until no large pieces remain.
A smooth paste ensures the flavors distribute evenly throughout the pani.
👨🍳 Chef Tip: Add only a small amount of water while blending to maintain concentrated flavor.
Prepare the Pani
Transfer the blended paste into a large bowl or jug. Add chilled water and mix thoroughly until fully combined.
The concentrated herb mixture transforms into flavorful pani after dilution.
👨🍳 Chef Tip: Always use chilled water for a refreshing street-food experience.
Adjust the Seasoning
Taste the pani and adjust the salt, black salt, tamarind, or spices according to your preference. The pani should taste slightly stronger than expected because it will be paired with the filling and puris.
Balancing flavors is the key to authentic pani puri.
👨🍳 Chef Tip: A perfect pani should have a balance of spicy, tangy, salty, and refreshing flavors.
Chill the Pani
Refrigerate the prepared pani for at least 30 minutes before serving.
Chilling allows the flavors to blend together and creates the refreshing taste that makes pani puri irresistible.
👨🍳 Chef Tip: Prepare the pani a few hours in advance for even better flavor development.
Prepare the Filling
In a large bowl combine boiled potatoes, boiled chickpeas, chaat masala, salt, red chili powder, and chopped coriander.
Mix gently until all ingredients are evenly distributed.
👨🍳 Chef Tip: Keep the potatoes slightly chunky rather than completely mashed for better texture.
Organize the Serving Station
Arrange the chilled pani, prepared filling, puris, spoons, and serving bowls in one place.
A well-organized setup makes assembly easier and ensures the puris stay crisp.
👨🍳 Chef Tip: Professional street vendors always keep all components ready before serving.
Check the Puris
Inspect the puris and remove any broken or soft pieces. Use only crisp, hollow puris for the best results.
Fresh crispy puris are essential for authentic pani puri.
👨🍳 Chef Tip: If puris lose crispness, warm them briefly in a low-temperature oven.
Fill the Puris
Gently crack the top of each puri and fill it with a spoonful of the prepared potato-chickpea mixture.
The filling should provide flavor without breaking the puri.
👨🍳 Chef Tip: Avoid overfilling, which can cause the puri to crack before serving.
Add the Chilled Pani
Carefully dip the filled puri into the chilled pani or pour the pani into the puri just before serving.
The puri should absorb enough pani to become flavorful while remaining crisp.
👨🍳 Chef Tip: Fill the pani only seconds before eating to preserve the crunch.
Serve and Enjoy Immediately
Serve the prepared pani puri immediately and enjoy it in a single bite for the authentic street-food experience.
The contrast between crispy puri, spicy pani, and flavorful filling creates the iconic pani puri sensation.
👨🍳 Chef Tip: Pani Puri is at its absolute best when eaten immediately after filling.
👨🍳 Pro Chef Secrets for Perfect Pani Puri
- Use fresh mint and coriander for maximum flavor.
- Always chill the pani before serving.
- Allow the pani to rest before serving for deeper flavor.
- Use black salt for authentic street-food taste.
- Keep the filling lightly seasoned.
- Use only fresh and crispy puris.
- Balance spicy, tangy, and salty flavors carefully.
- Add ice cubes just before serving.
- Prepare all components separately.
- Fill the puris only moments before eating.
❌ Common Mistakes to Avoid
- Using stale or soft puris.
- Skipping the chilling step for the pani.
- Adding too much water and diluting the flavors.
- Making the pani overly spicy.
- Using old mint or coriander leaves.
- Overfilling the puris.
- Preparing filled puris too early.
- Ignoring flavor balance while seasoning.
- Using warm water for the pani.
- Serving after the puris become soggy.
Popular Pani Puri Variations
- 🌶️ Mumbai Style Pani Puri
- 🌿 Kolkata Puchka
- 🥔 Delhi Golgappa
- 🫘 Ragda Pani Puri
- 🥭 Sweet & Tangy Pani Puri
- 🔥 Extra Spicy Pani Puri
- 🌱 Sprouts Pani Puri
- 🧀 Paneer Pani Puri
- 🍎 Fruit Pani Puri
- 🥣 Dahi Pani Puri
🍽️ Serving Suggestions
Serve Pani Puri immediately after filling for the ultimate street-food experience. Create a complete chaat platter by serving it alongside Dahi Puri, Sev Puri, Bhel Puri, Papdi Chaat, and Ragda Pattice. For parties, arrange the puris, filling, and pani separately so guests can assemble their own fresh Pani Puris.
🧊 Storage & Reheating
🧊 Refrigerator
Store the prepared pani in an airtight container for up to 2 days. Keep the filling refrigerated separately for up to 3 days.
❄️ Freezer
The pani is best enjoyed fresh and is not ideal for freezing. However, the potato-chickpea filling can be frozen for up to 1 month.
♨️ Reheating
If using refrigerated filling, allow it to come to room temperature or warm slightly before serving. Puris should always be served crisp and fresh.
Make Ahead Tips
- Prepare the pani up to one day in advance.
- Store the pani in the refrigerator to enhance flavor.
- Boil potatoes and chickpeas ahead of time.
- Mix the filling a few hours before serving.
- Keep puris in an airtight container.
- Prepare extra pani for larger gatherings.
- Organize all serving components before guests arrive.
- Assemble only when ready to eat.
🥗 Nutrition Information (Approx. Per Serving)
These values are approximate and may vary depending on the ingredients used and serving size.
Calories
Protein
Carbohydrates
Fat
Fiber
Sodium
❤️ Health Highlights
- Mint and coriander provide natural antioxidants.
- Potatoes and chickpeas contribute fiber and energy.
- Contains refreshing herbs that enhance flavor naturally.
- Homemade pani allows complete control over ingredients.
- Can be customized with sprouts for added nutrition.
- Lower in fat than many deep-fried snacks when enjoyed in moderation.
- Provides a satisfying balance of textures and flavors.
- A fun and flavorful option for special occasions.
💡 Did You Know?
Pani Puri is known by different names across India. In Mumbai it is called Pani Puri, in Delhi it is often known as Golgappa, in West Bengal it is called Puchka, and in some eastern states it is known as Gupchup. Despite the different names and regional variations, it remains one of India’s most iconic street foods.
Frequently Asked Questions
What is the difference between Pani Puri and Golgappa?
They are essentially the same dish, but the name varies by region. Flavor profiles may differ slightly depending on local traditions.
Can I prepare the pani in advance?
Yes. In fact, the pani often tastes even better after chilling for several hours.
Why is my pani not flavorful enough?
The herbs, spices, or tamarind may be insufficient. The pani should taste slightly stronger before serving.
How do I keep puris crispy?
Store them in an airtight container away from moisture and fill them only when ready to eat.
Can I make Pani Puri less spicy?
Yes. Reduce the quantity of green chilies and increase the tamarind slightly for balance.
Can I use sweet chutney in Pani Puri?
Absolutely. Many people enjoy adding sweet tamarind chutney to the filling for extra flavor.
Which filling is traditionally used?
Boiled potatoes and chickpeas are among the most common traditional fillings.
Can children eat Pani Puri?
Yes. Simply reduce the spice level and prepare a milder version of the pani.
How long does homemade pani stay fresh?
When refrigerated properly, it remains fresh for about 2 days.
Can I use bottled water for the pani?
Yes. Many people prefer filtered or bottled water for the cleanest flavor and food safety.
Related Recipes You May Like
Why This Pani Puri Recipe Works
This recipe combines fresh herbs, tangy tamarind, aromatic spices, and perfectly balanced seasoning to create authentic street-style pani. The lightly spiced potato-chickpea filling complements the refreshing water beautifully, while crisp puris provide the signature crunch. By chilling the pani and assembling just before serving, you get the same vibrant flavor and texture that make Pani Puri one of India’s most beloved street foods.
🌟 Expert Serving Tip
For a true street-food experience, serve the pani ice-cold and keep the puris, filling, and pani in separate bowls. Allow each person to assemble their own Pani Puri moments before eating. This keeps every puri perfectly crisp and delivers the freshest flavor possible.