Peda Recipe | Traditional Milk Peda Sweet
Learn how to make soft, rich, and delicious Peda at home with this traditional Indian sweet recipe. Made using milk solids, sugar, cardamom, and ghee, Peda is a popular festive dessert enjoyed during Diwali, Raksha Bandhan, Janmashtami, and other celebrations. This easy step-by-step recipe creates melt-in-the-mouth Pedas with authentic flavor and texture.
Recipe Overview
Recipe Summary
Prep Time
10 Min
Cook Time
35 Min
Total Time
45 Min
Difficulty
Easy
Yield
18 Pedas
Calories
125 kcal
About This Recipe
Peda is one of India’s most beloved traditional sweets, known for its rich milky flavor, soft texture, and festive significance. It is commonly prepared during religious celebrations, festivals, and special family occasions.
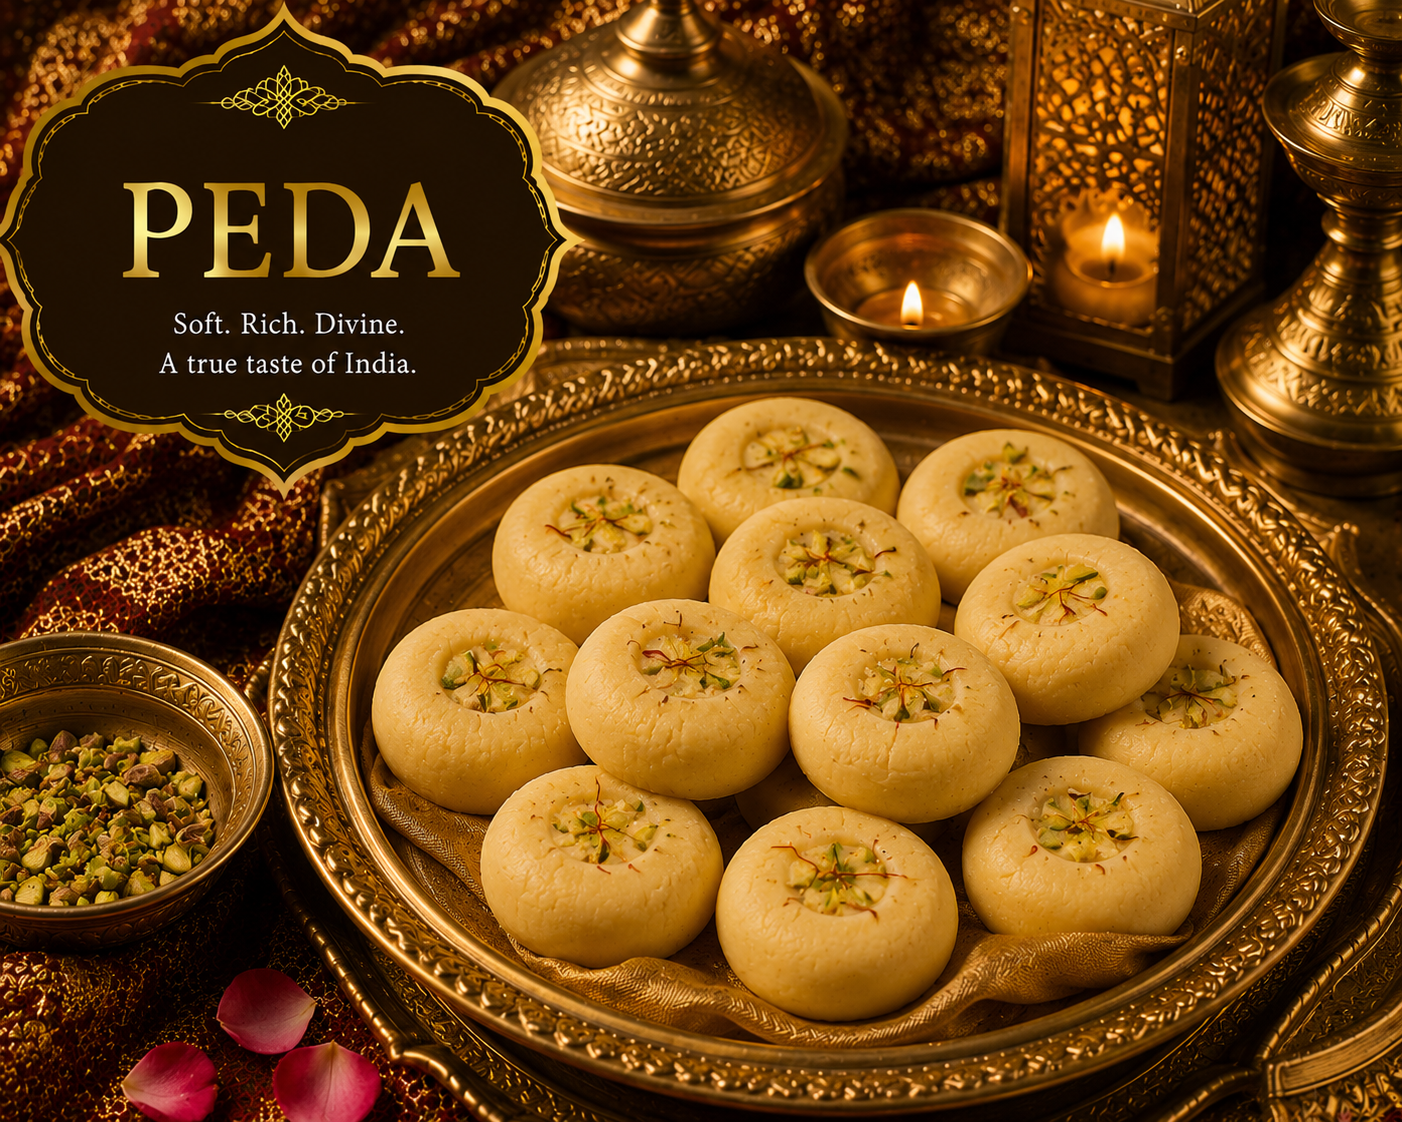
Traditional Peda is made by slowly cooking khoya (mawa) with sugar and aromatic cardamom until a smooth dough-like mixture forms. The mixture is then shaped into small discs and garnished with nuts for an elegant presentation.
This recipe delivers authentic sweet-shop-style Peda with simple ingredients and easy techniques suitable for home cooks.
Why You’ll Love This Peda Recipe
- Authentic traditional Indian sweet.
- Rich and creamy milk flavor.
- Perfect for festivals and celebrations.
- Easy to prepare at home.
- Melt-in-the-mouth texture.
- Requires simple ingredients.
- Beautiful homemade gift option.
- Customizable with different flavors.
- Kid-friendly dessert.
- Better than many store-bought versions.
What Makes This Peda Special?
The secret to excellent Peda lies in slowly cooking the milk solids until they develop a rich caramelized flavor while maintaining a soft texture. Cardamom adds classic aroma, while ghee enhances richness and smoothness.
Unlike many quick recipes, this traditional approach creates authentic flavor and texture similar to sweets found in renowned Indian mithai shops.
Main Ingredients
For Garnishing
Optional Flavorings
Equipment Needed
Ingredient Substitutions
- Khoya (mawa) can be replaced with milk powder for an instant version.
- Powdered sugar may be replaced with fine caster sugar.
- Ghee can be replaced with unsalted butter.
- Cardamom powder may be replaced with saffron for a royal flavor.
- Pistachios can be substituted with almonds or cashews.
- Rose water may replace cardamom for floral notes.
- Jaggery powder can be used instead of sugar for a traditional variation.
- Cocoa powder can be added for chocolate peda.
- Mango pulp can be mixed in for mango peda.
- Saffron milk can replace plain milk flavoring.
Step-by-Step Instructions
Prepare the Khoya
Crumble the khoya into small pieces using your hands.
This helps it cook evenly and prevents lumps.
👨🍳 Chef Tip: Fresh khoya gives the richest flavor and smoothest texture.
Heat the Pan
Place a heavy-bottom pan over low heat.
Add the ghee and allow it to melt gently.
👨🍳 Chef Tip: Low heat prevents scorching and preserves the milk flavor.
Cook the Khoya
Add the crumbled khoya to the pan.
Cook while stirring continuously.
👨🍳 Chef Tip: Constant stirring prevents sticking and burning.
Develop Flavor
Continue cooking until the khoya becomes aromatic and slightly creamy.
The color should remain light.
👨🍳 Chef Tip: Avoid over-browning unless making Dharwad-style peda.
Add Cardamom
Sprinkle cardamom powder into the mixture.
Mix thoroughly to distribute the aroma.
👨🍳 Chef Tip: Freshly ground cardamom provides the best flavor.
Cool Slightly
Remove the pan from heat.
Allow the mixture to cool for 5–7 minutes.
👨🍳 Chef Tip: Adding sugar while extremely hot can affect the texture.
Add Sugar
Mix in the powdered sugar gradually.
Stir until fully incorporated.
👨🍳 Chef Tip: Powdered sugar blends more smoothly than granulated sugar.
Cook Briefly Again
Return the mixture to low heat.
Cook for 2–3 minutes until it forms a soft dough.
👨🍳 Chef Tip: Do not overcook or the pedas may become dry.
Cool for Shaping
Transfer the mixture to a plate.
Allow it to cool until warm and easy to handle.
👨🍳 Chef Tip: Warm mixture shapes more smoothly than a hot one.
Shape the Pedas
Take small portions and roll them into smooth balls.
Flatten them gently into traditional peda shapes.
👨🍳 Chef Tip: Keep sizes uniform for a professional appearance.
Garnish
Press chopped pistachios or almonds onto each peda.
Add saffron strands if desired.
👨🍳 Chef Tip: Garnishing while the peda is slightly warm helps nuts adhere better.
Set and Serve
Allow the pedas to rest for 20–30 minutes.
Serve or store in an airtight container.
👨🍳 Chef Tip: Resting improves texture and flavor development.
👨🍳 Perfect Peda Secrets
- Use fresh high-quality khoya.
- Cook only on low heat.
- Stir continuously while cooking.
- Add sugar after slight cooling.
- Avoid overcooking the mixture.
- Use freshly ground cardamom.
- Shape while the mixture is warm.
- Keep peda sizes uniform.
- Allow adequate setting time.
- Store properly to maintain softness.
🥛 Perfect Khoya Cooking Guide
The ideal khoya mixture should be soft, aromatic, and smooth. It should easily come together without becoming dry or greasy.
🌟 Traditional Peda Shaping Techniques
Classic peda is shaped by rolling a small portion of the mixture into a smooth ball and then gently flattening it. Many sweet shops use decorative molds or thumb impressions in the center for an elegant appearance.
Uniform shaping not only improves presentation but also helps maintain consistent texture throughout the batch.
🎉 Festival Sweet Secrets
Traditional Indian sweet makers often add saffron, rose water, pistachios, and silver leaf to elevate the flavor and appearance of peda during festive occasions such as Diwali, Janmashtami, and Raksha Bandhan.
Premium ingredients and slow cooking are the keys to authentic mithai-shop quality.
❌ Common Mistakes to Avoid
- Using stale khoya.
- Cooking on high heat.
- Adding sugar too early.
- Overcooking the mixture.
- Skipping continuous stirring.
- Shaping while too hot.
- Making pedas of uneven size.
- Using excess sugar.
- Not allowing them to set properly.
- Storing in open air.
Popular Peda Variations
- 🥛 Classic Milk Peda
- 🌼 Kesar Peda
- 🌹 Rose Peda
- 🥭 Mango Peda
- 🍫 Chocolate Peda
- 🌰 Dry Fruit Peda
- 🧡 Mathura Peda
- ☕ Coffee Peda
- 🥥 Coconut Peda
- 🍯 Jaggery Peda
🍽️ Serving Suggestions
Serve Peda as a festive dessert, prasad, or after-meal sweet treat. It pairs wonderfully with masala chai, saffron milk, cardamom milk, and traditional Indian festive meals.
For celebrations, arrange the pedas on decorative trays and garnish with pistachios, saffron strands, or edible silver leaf for a premium mithai-shop presentation.
🧊 Storage & Shelf Life Guide
🧊 Refrigerator
Store in an airtight container for up to 7 days.
❄️ Freezer
Freeze for up to 1 month in a sealed container.
🌡️ Before Serving
Bring to room temperature for the softest texture and best flavor.
Make Ahead Tips
- Prepare the khoya mixture one day in advance.
- Shape pedas several hours before serving.
- Store garnishes separately until needed.
- Keep pedas refrigerated during warm weather.
- Use airtight containers to retain freshness.
- Freeze extra batches for festivals.
- Allow refrigerated pedas to reach room temperature before serving.
- Decorate just before presentation for the best appearance.
🥗 Nutrition Information (Approx. Per Peda)
Nutritional values are approximate and may vary depending on ingredients, size, and garnishing.
Calories
Protein
Carbohydrates
Fat
Calcium
Sugar
❤️ Health Highlights
- Contains calcium from milk solids.
- Provides moderate protein.
- Rich source of dairy nutrients.
- Offers quick energy from carbohydrates.
- Can be customized with healthy nuts.
- Contains beneficial milk fats.
- Suitable for festive celebrations in moderation.
- Homemade versions allow better ingredient control.
💡 Did You Know?
Peda is believed to have originated in the historic city of Mathura in Uttar Pradesh, which is also associated with the birthplace of Lord Krishna. Mathura Peda remains one of the most famous traditional Indian sweets and is enjoyed throughout the country during religious festivals and celebrations.
Frequently Asked Questions
Can I make peda without khoya?
Yes. Milk powder-based recipes are a popular alternative for quick homemade peda.
Why is my peda mixture sticky?
The mixture may be undercooked or still too warm for shaping.
Why did my pedas become dry?
Overcooking the khoya mixture can remove too much moisture.
Can I reduce the sugar?
Yes. Adjust the sweetness according to your personal preference.
Can I add saffron?
Absolutely. Saffron enhances both flavor and appearance.
How long do pedas stay fresh?
They typically remain fresh for up to 7 days when refrigerated properly.
Can I freeze pedas?
Yes. Freeze in airtight containers and thaw before serving.
Which nuts work best for garnish?
Pistachios, almonds, and cashews are traditional choices.
Can I make flavored pedas?
Yes. Mango, rose, saffron, chocolate, and coconut flavors are popular variations.
What is the difference between Mathura Peda and regular Peda?
Mathura Peda is cooked longer, giving it a deeper caramelized flavor and darker color.
Related Recipes You May Like
Why This Peda Recipe Works
This recipe follows traditional sweet-making techniques by slowly cooking khoya, balancing sweetness, and allowing proper cooling before shaping. The result is a rich, soft, and flavorful peda with authentic mithai-shop quality.
🌟 Expert Serving Tip
For premium presentation, lightly press pistachios into the center of each peda and garnish with a few saffron strands. This simple touch makes homemade peda look festive and professional.
Chef’s Final Note
Perfect Peda is all about patience and gentle cooking. Use fresh khoya, cook slowly, and avoid overcooking the mixture. With these simple techniques, you’ll create rich, melt-in-the-mouth pedas worthy of any celebration.
⭐ Rate This Recipe
If you enjoyed this traditional Peda recipe, save it for festivals, family gatherings, and special occasions. Share it with friends and family and enjoy the joy of homemade Indian sweets.